A New Direction and a New Blog

To all my readers, thank you for being faithful followers of this blog! I’ve loved knowing that people from all over the world have shared the activities in my kitchen. During the past few years since I began this blog, I’ve shared almost 250 recipes and had a lot of fun doing so.

My life has taken on a new direction lately, and I decided that my blog should do the same. I have begun a new, self-hosted blog called Flavour&Savour. I’m excited about the possibilities open to me now with this new space of mine on the web.


Flavour and Savour. Simple clean-eating recipes from my island home.


I hope you’ll continue to follow me by subscribing to my new blog at https://www.flavourandsavour.com/ Just visit my new site and enter your email address in the “Subscribe” box and never miss a new post. Remember that your email address will never be shared. I would also be grateful if you would help promote my blog by “Liking” my Facebook page at https://www.facebook.com/flavourandsavour

Thank you!
Elaine

Posted in Uncategorized | Comments Off on A New Direction and a New Blog

Blueberry Coconut Smoothie with Fresh Ginger

BlueberrySmoothie with Fresh Ginger by JoinMeForDinner

Choices. Every day I’m able to make choices about my diet, my health or my activities. One day earlier this week I considered being lazy by picking up a few packages of blueberries at my local supermarket but, thankfully, I banished that thought from my mind, smartened up and headed for a U-Pick Blueberry Farm.
Steld Farmkids yes dogs no
Good choice. Great choice! Branches drooping, heavy with ripe fruit, just begging to be picked, warm sunshine, and two little girls excited to be filling their buckets (and their mouths) with fresh sweet blueberries were all things that combined to make a perfect morning. Buying blueberries at the store would have been faster, but could you imagine missing this “sister moment”?

Sister Love. Taking a break in the blueberry patch.

Sister Love. Taking a break in the blueberry patch.

Every morning I can make choices about how to begin my day. On this particular day, I made a great choice to head outside and pick my own berries and as a result, my morning was filled with laughter and love. A healthy smoothie is usually what I choose for breakfast. This Blueberry Coconut Smoothie is full of antioxidants and is a perfect way to be kind to your body and give it what it needs. Often when you add kale or spinach to a smoothie it turns into an unappetizing brownish sludgy-looking thing, but the colour of the blueberries dominate in this one. Try it tomorrow while blueberries are plentiful and readily available. Freeze them now for the winter and you’ll be able to begin your day with memories of warm summer mornings.

Blueberry Coconut Smoothie with Fresh Ginger
Serves 1

Ingredients
1/2 cup frozen blueberries
handful of kale (or spinach)
1 cup unsweetened coconut (or almond) milk
2 Tbsp. yogurt
1 Tbsp. melted coconut oil
1 teaspoon fresh grated ginger
2 teaspoons honey
2 ice cubes
fresh mint, for garnish

Combine all ingredients in a blender. Pour into a glass, garnish with fresh mint and detox!


So . . . what’s your favourite smoothie combo? Is there something you add to yours every day? What else do you eat to start your day off right? Share your ideas in the comments section so we can all benefit.
Blueberry Ginger Smoothie
For more easy recipes like this, please Like me on Facebook, follow my Pinterest boards, and subscribe to my new site Flavour and Savour.

Posted in beverages, breakfast | Tagged , , , , , , | Comments Off on Blueberry Coconut Smoothie with Fresh Ginger

Garden Fresh Kale Salad

This Garden Fresh Kale Salad is easy to make, packed full of everything good for you, and uses local, readily available vegetables.
Garden Fresh Kale Salad
It was recently brought to my attention that my recipe for Kale Salad is not on my blog. Strawberry Feta Salad with Baby Kale is buried several posts back but there is a definite void in the Kale Salad Department. Now I realize that Kale Salad is kind of . . . well, out of vogue in the food blogging world, but really, who cares? Put your hand up if you like it. See? Everyone looks at it suspiciously at first and then they try it. And they like it. And then they feel self-righteous about eating it because it is so nutritious.

My version of Kale Salad is mine because all the veggies in it are straight out of my garden: freshly picked kale, just-pulled beets and crunchy carrots. Sometimes I toss in chick peas for extra protein, but they are not essential, especially if you are serving another main protein with your meal. I tie it all together with either a Balsamic Vinaigrette or a Lemon Vinaigrette, depending on my mood. Feeling Italian? Go for the deep rich flavour of the Balsamic. Greek? Stick with the Lemon and add a little crumbled feta cheese. If you grow your own kale, pick those tender leaves early in the morning. If you buy your kale, be sure to remove the tough central stem and massage the leaves gently with olive oil first. Kale leaves have a bit of a waxy surface and incorporating a little olive oil helps to tenderize them while adding flavour too. I crave the crunchy seeds that top this salad. Usually I use high-protein pumpkin and sunflower seeds, toasted and topped with a little tamari, but today I substituted unsalted pistachios and cashews when I discovered an empty pumpkin seed jar in my pantry.
Garden Fresh Kale Salad ready to toss


Garden Fresh Kale Salad
Serves 6 as a side salad

Ingredients
about 3-4 cups of finely chopped kale (approx 8 leaves, stems removed)
1 1/2 cups grated or julienned raw carrots
1 1/2 cups grated or julienned raw beets (or red cabbage)
1/4 cup pumpkin seeds
1/4 cup sunflower seeds
1-2 tsp extra virgin olive oil
1 tsp tamari

Vinaigrette Ingredients
1/4 cup extra virgin olive oil
2 Tbsp. good quality Balsamic vinegar
1 tsp. dried oregano

Directions
1. Wash kale leaves and remove the central stem. Chop finely. Put in a large bowl, drizzle with a little olive oil and gently massage the oil into the leaves for a minute or two.
2. Grate or julienne the carrots and beets (or cabbage)
3. Toast the pumpkin and sunflower seeds by putting them in a heated fry pan over medium heat. Watch very carefully, stirring until they just start to turn brown. Remove from heat and toss with the tamari sauce until well coated. Cool.
4. Whisk the vinaigrette ingredients together. Toss the salad with the vinaigrette just before serving.

Posted in gluten-free, lunch, salad dressing, salads, vegetables, vegetarian meals | Tagged , , , , , , | Comments Off on Garden Fresh Kale Salad

Easy Zucchini Chips

Easy Zucchini Chips

With an overload of zucchini in my garden (how can something grow so fast?) I am running out of ideas for ways to use this veggie. I’ve made all my favourite recipes and have a freezer full of Zucchini Patties ready for quick winter meals. Today I was NOT happy to find these hiding behind the leaves of my two plants.
too many zucchini
I decided to make another batch of zucchini chips since last week’s batch was inhaled in less than 10 minutes. These chips are easy to prepare and really tasty. Dry them as best you can and you’ll shorten your oven time. Go easy on the oil so they don’t turn out greasy and cut them not too thick but not too thin. Capiche? I found 1/8th inch to be just about right. If they’re too thin, they just crumble. If they’re too thick they take too long to crisp and they don’t really seem like chips.

Easy Oven Zucchini Chips

Ingredients

Directions
Making zucchini chips
1. Slice the zucchini in uniform slices about 1/8 inch thick. A mandolin works best for this task. A large zucchini works well for this recipe as the slices will shrink significantly when baked.
2. Lay the slices on paper towel. Pat them with another paper towel to remove as much moisture as you can.
3. Toss them with a small amount of olive oil. Sprinkle sparingly with salt or other seasonings of your choice.
4. Lay them on parchment paper lined baking sheets, making sure they don’t overlap.
5. Bake at 250F. for about 1 to 1 1/2 hours, turning half way through. Check them occasionally and remove when they are lightly browned and crispy. Cool on a wire rack.
Best eaten right away. Watch them disappear quickly!


Posted in boating or camping food, finger foods, vegetables | Tagged , , , | 4 Comments

Fresh Figs with Goat Cheese and Toasted Hazelnuts

Fresh Figs with Goat Cheese

The figs on my new fig tree are ripening so I celebrated by making this quick and easy fresh fig appetizer with goat cheese and nuts as a mid-afternoon snack. I had almost given up on my tree earlier this spring. It looked as dead as a doorknob so I figured it had succumbed to the cold snap we had in January. But late in May it suddenly showed some tiny sprouts and now look at it!
Fig tree
Figs are delicate little things. They don’t keep well and should be eaten either immediately or kept refrigerated at eaten within 2-3 days. You will know they are ripe when they start to droop from the branch and feel slightly soft. In the photo above you can see that the two on the right are ready to be picked. I polished off the first one with about three slurpy bites. You can occasionally find fresh figs in local stores or at farmer’s markets. If you are lucky enough to spot a roadside stand, screech to a halt. Last summer I chanced upon a stand with two little boys selling their figs at the end of their driveway. Score!

This fig appetizer with goat cheese is quick, easy, and fresh, fresh, fresh!
Fresh figs with goat cheese and hazelnuts.jpg


Fresh Figs with Goat Cheese and Toasted Hazelnuts
One fig yields about 4 slices

  • fresh figs
  • goat cheese
  • toasted chopped hazelnuts
  • balsamic reduction

Freshly sliced fig
Directions
Carefully slice the figs and lay out on a serving plate. Top with a little goat cheese (or blue cheese), drizzle with a tiny bit of balsamic reduction and sprinkle with toasted, chopped hazelnuts. Serve immediately, preferably with a glass of crisp, chilled Prosecco. Enjoy.


Fresh fig appy

Like what you see here? Subscribe to my new blog, Flavour and Savour and never miss a recipe. “Like” my Facebook page here. Thanks!

Posted in appetizers, finger foods | Tagged , , , | 2 Comments

Blueberry Cheesecake in a Jar

I’ve moved! Like what you see here? Subscribe to my new blog, Flavour and Savour and never miss a recipe.  Thanks!

Flavour and Savour. Simple clean-eating recipes from my island home.

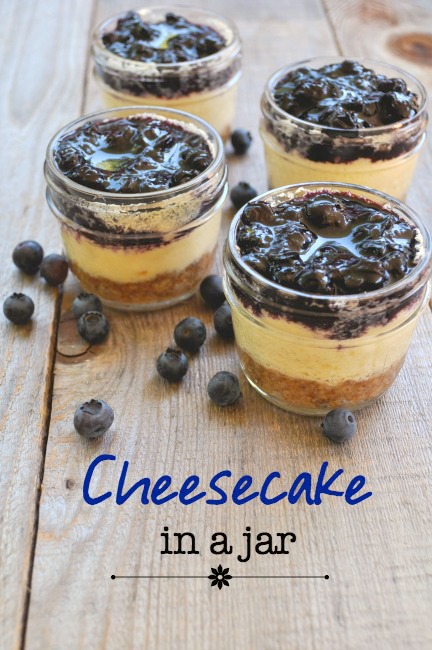
This mini gluten-free Cheesecake in a Jar is a perfectly decandent dessert to pack for your next camping trip.

Blueberry Cheesecake in a Jar. Gluten-free. It’s camping season here on the West Coast and if this stretch of PERFECT weather holds, we’ll be doing a lot more of it. “Camping” means different things to different people: backpacking and sleeping on the ground, kayaking and sleeping on a secluded beach, or taking off in a fully equipped RV. In my case, it’s boat-camping: finding a quiet cove in which to anchor for the night.

I used to love to go tent camping, or at least I loved the idea of it. In reality, however, we were often downright miserable. We would squish three kids in the back seat of a station wagon, cram our gear in the back, strap an overloaded roof rack on top and invariably end up in the pouring rain wondering when the fun would begin. I recall one particular trip in which my hubby became noticeably silent sullen after trying to pound plastic tent pegs into ground that was as hard as concrete. Later on, after washing the dishes in lukewarm water in a plastic tub, he commented, “I just don’t get it. I built you a big beautiful house and you want to play house in the woods?!”

Camping has changed for us now. It’s become “glamping” as we add a little glamour to our overnight adventures on our boat. I’m not ashamed to admit that I like sleeping in nice bedding instead of a lumpy sleeping bag. I like being able to charge my phone, make a cup of herbal tea and have ice in my drinks. But most of all, I like the fact that outhouses are a thing of the past now that our new boat has a head on it.
Islands Collage

Preparing food for a small refrigerator can be challenging. We like to avoid packaged foods when we are cooking at home, and we like to do the same when we travel. Cooking “from scratch” allows us to avoid resorting to store-bought or junk food when we go away. We like seeing, chopping, mixing and cooking our ingredients before we eat them. This recipe for cheesecake allows us to have a sumptuous dessert with our “glamping” meals. I make a batch, take what we need, and freeze the rest for future trips. These stayed in perfect non-nom worthy condition on our last trip.
Goat Cheesecake in a Jar

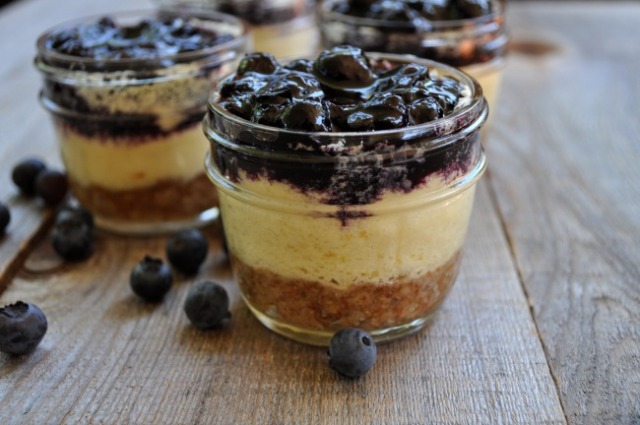
Gluten-free Cheesecake in a Jar

Makes about 14 125ml (1/2 cup) jars
Ingredients
Crust:
1 cup blanched almond flour (almond meal will work, too)
1 Tbsp. maple syrup
2 Tbsp. coconut oil, melted
1/2 teaspoon baking soda
1/8 teaspoon sea salt

Filling:

8 oz. brick of cream cheese (regular or reduced-fat) at room temperature
8 ounces fresh soft goat cheese at room temperature
3/4 cup sugar
1 teaspoon finely grated lemon zest (use a microplane to grate it finely)
1 teaspoon fresh lemon juice
1 teaspoon vanilla extract
6 large eggs, separated
3 tablespoons all-purpose flour (or gluten-free flour)

Topping:
1 cup berries of your choice: blueberries, Saskatoon berries, raspberries
1-2 Tbsp. honey, depending on the sweetness of your berries
1 Tbsp. fresh lemon juice

Directions
Preheat oven to 350F.
Wash and dry 12-14 125ml (1/2 cup) mason jars. Set aside.

Crust:
Process all ingredients in a food processor until well mixed. Press about 1 Tbsp. into the bottom of each mason jar, smoothing it out with the back of a spoon.

Filling:

    1. Using an electric mixer on medium speed, beat cream cheese, goat cheese, lemon zest, lemon juice, vanilla, and 3/4 cup sugar in a large bowl until smooth and creamy, about 3 minutes.
    2. Add egg yolks two at a time, beating to blend and scraping down sides of bowl between additions. Reduce speed to low, add flour, and mix just until blended. GoatCheeseCheesecake
    3. Using clean, dry beaters, beat egg whites in a medium bowl until soft peaks form. Fold 1/4 of egg whites into goat cheese mixture just until blended; fold in remaining egg whites just until blended.

Fill the jars

  1. Carefully spoon the cheese mixture into the jars, leaving at least 1/2 inch headroom. Put the jars on a baking sheet and bake at 350F for 25 minutes or just beginning to brown around the edges.
  2. Turn the oven off, open the door and let the cheesecakes sit in the oven for about 10 minutes. Remove and cool on a wire rack. They will very likely fall, but don’t despair. You need room in that tiny jar for the berry topping.Cheesecake in a jar

Topping:
Combine the berries, honey and lemon juice in a small saucepan and heat gently over medium heat until hot and just beginning to bubble. Remove from heat and cool completely. Spoon over the completely cooled cheesecakes, top with a lid and refrigerate or freeze for your next camping trip.

Blueberry Cheesecake in a Jar

Savour at sunset
Like what you see here? Subscribe to my new blog, Flavour and Savour and never miss a recipe. “Like” my Facebook page here. Thanks!

Posted in boating or camping food, desserts, gluten-free, shot glass desserts | Tagged , , , , , , | Comments Off on Blueberry Cheesecake in a Jar

Seriously Good Grain-Free Brownie Bites

Grain Free Brownie Bites

These little grain-free brownies are one hundred times better than those store-bought brownie bites in the brown paper bag. One hundred. And they’re gluten-free, dairy-free, and refined sugar-free as well! Not only that, but they take less than five minutes to make and only dirty one bowl (your food processor). A win-win.
Chocolate Hazelnut Mini Cupcakes
I’ve found that some of the photos of gluten-free recipes that are circulating look incredibly good and their recipes sound wonderfully delicious. In reality, however, they’re disappointing: hard little lumps of dough masquerading as scones, or mushy discs pretending to be cookies. This recipe for mini chcocolate cupcakes is actually more like a brownie because the finished product is quite dense. But they are incredibly good and wonderfully delicious and you should definitely make them. Soon.

Seriously.

And by the way, they freeze well. Make ’em and hide them for spur-of-the-moment dinner parties. I served these last night with my sugar-free Strawberry Banana Ice Cream that my Vitamix kindly whipped up for me in about 30 seconds flat. Love that machine!

Seriously Good Grain-Free Brownie Bites

Makes 24 mini-cupcakes
Ingredients

  • 1 1/2 cups dark chocolate chips
  • 1 cup hazelnuts
  • 3 large eggs
  • 1/4 cup honey
  • 1 tsp. vanilla extract
  • 1/4 tsp. sea salt

Directions

1. Preheat oven to 350°F. Line 24 mini-muffin tins with paper liners.

2. Combine the chocolate chips and hazelnuts in a food processor and process until you can’t get them any finer ground, but before they start to clump together into a dough.

3. Add the eggs, honey, vanilla and salt and process for a full minute or two.

4. Fill muffin tins almost to the top as these won’t rise significantly. Bake for about 20-25 minutes or until a toothpick inserted in the center comes out clean. Let cool in the pan.

5. Just eat them as is, or frost with Whipped Chocolate Coconut Milk Frosting

Whipped Chocolate Coconut Cream Frosting

    •  1 (14 ounce) can full-fat organic coconut milk, refrigerated overnight
    • 1 (10 ounce) bag dark chocolate chips

Melt the chocolate over low heat in a medium pot. Remove the can of coconut milk from the refrigerator. Carefully open it and scoop the hardened milk from the can into the pot. Stir until melted and combined. Remove from heat, let cool. When cool, beat with an electric mixer until light and fluffy. (Soooo good!)


SeriouslyGoodGlutenFreeBrownies

Definitely pinnable.
Like what you see here? Subscribe to my new blog, Flavour and Savour and never miss a recipe. “Like” my Facebook page here. Thanks!

Posted in cakes, desserts, gluten-free, nuts | Tagged , , , , , , , , | 1 Comment

Summer Berry Crisp: Gluten-Free and Dairy-Free

Saskatoon Berry Crisp

This gluten-free berry crisp is just so good for you it could be either breakfast or dessert.
Or both. Use blueberies, Saskatoon berries, strawberries or whatever berries are in season in your neck of the woods.

Serve it with a dollop of plain yogurt in the morning or with whipped coconut milk after dinner, or just enjoy it as is.

I used Saskatoon berries because I happen to have a love affair with them and the Saskatoon berry farm just down the road has them all picked and ready for me to simply drive up and bring them home to freeze for the winter. Blueberries, or any summer fruit will work equally as well in this recipe. Just prepare your berries, spoon them into ramekins or a large baking dish and top with my Gluten-Free Hazelnut Granola.

Gluten-Free Berry Crisp

Gluten-Free Dairy-Free Summer Berry Crisp
Serves 8
Ingredients

  • 4 cups Saskatoon berries, blueberries or other berries
  • 2 Tbsp. tapioca starch
  • 3 Tbsp. lemon juice
  • 1/4 cup honey or maple syrup (or less depending on the sweetness of your berries)
  • 1 tsp. almond extract
  • 1 tsp. cinnamon
  • Topping: 2 cups Gluten-Free Hazelnut Granola

Directions

Preheat oven to 350F.

1. Toss berries gently with tapioca starch, lemon juice, honey, almond extract and cinnamon. Spoon into 8 ramekins or a 9 inch baking dish.

2. Top with granola, making sure the berries are completely covered. Place the ramekins or baking dish on a baking sheet as the berries sometimes bubble over.

3. Bake at 350F. for approximately 25-30 minutes or until berries are bubbling. Serve warm or cold. It is equally as good!


Like what you see here? Subscribe to my new blog, Flavour and Savour and never miss a recipe. “Like” my Facebook page here. Thanks!

Posted in breakfast, desserts, gluten-free, nuts | Tagged , , , , , , | Comments Off on Summer Berry Crisp: Gluten-Free and Dairy-Free

Watermelon Limeade with Cucumber and Fresh Mint


Watermelon Limeade

The little ones have gone home again, but the big watermelon that they couldn’t finish remains. So do the sticky pancakes-and-syrup fingerprints and tiny Playmobil people left behind (and apparently terribly missed!) under the deck chairs. The house is pretty quiet without them wiggling and giggling and asking, “What are we going to do next?” We miss them already, but we love our adult routines too.

A relaxing happy hour on the deck seemed like a good idea. With half a watermelon in the refrigerator taking up way too much space, turning it into a refreshing drink was the thing to do. Mixed with cucumber and fresh mint from the garden and some freshly squeezed lime juice, it’s one I want to remember and make again.

WatermelonLimeade by JoinMeForDinner

Watermelon is not only fun to eat, it’s good for you too. Besides being an antioxidant and containing significant levels of Vitamins A, C and B6, it’s a great source of potassium and it provides more lycopene than any other fresh fruit or vegetable, even more than tomatoes.

Watermelon Limeade with Cucumber and Fresh Mint

Serves 6

Ingredients

  • 1 1/2 cups hot water
  • 1/4 cup honey
  • 4 cups watermelon cubes
  • 1 cucumber, peeled
  • juice of 3 limes (or lemons if you want lemonade)
  • 1/3 cup chopped fresh mint leaves

Directions

  1. Pour hot water over the honey and stir until combined.
  2. Squeeze the limes (or lemons) to extract the juice.
  3. Place the watermelon, cucumber, lime or lemon juice and honey mixture in a high-speed blender. Process until smooth.
  4. Using a fine sieve, strain the juice into a pitcher. Don’t skip this step!
  5. Add the mint leaves and chill.
  6. Serve over ice.

We finished off the rest of the melon with these Watermelon Feta Stacks as snacks.

Watermelon Feta Stacks2.jpg

You can keep this drink refreshing, healthy and kid-friendly OR you can add a shot of vodka to it. Alternatively, rim the glass with coarse sea salt, add a shot of tequila and call it a Margarita! What do YOU do with leftover watermelon?
Watermelon Margarita.jpg

Posted in BBQ, beverages | Tagged , , , , , , , | Comments Off on Watermelon Limeade with Cucumber and Fresh Mint

Fresh Green Bean and Zucchini Salad with Balsamic Dressing


Green Bean & Zucchini Salad with Balsamic Dressing.jpg

If you live where I do and you have a garden, you’re likely experiencing a similar problem of “too much and all at once” with this hot and sunny weather we’re enjoying. Two short rows of green beans in our garden yielded two of these deep 10 inch bowls in two days . . . and I know there will be more tomorrow.
fresh green beans

What do you do with all those extra beans, besides pickle them, freeze them or give them away? Try this fresh and crispy summerlicious salad. Tender crisp beans are tossed with other garden offerings: raw chunks of zucchini, sliced green onions, halved cherry tomatoes, and fresh dill and drizzled with a balsamic dressing.
Fresh Green Bean and Zucchini Salad by JoinMeForDinner


Fresh Green Bean and Zucchini Salad with Balsamic Dressing
Serves 6
Ingredients
4 cups fresh green beans, trimmed and snapped into bite-sized pieces*
1 medium zucchini, cubed
1 cup mini San Marzano tomatoes (or cherry tomatoes)
2 green onions (scallions) sliced thinly
2 Tbsp. finely chopped fresh dill
1/2 cup crumbled feta cheese
6 Tbsp. extra virgin olive oil
3 Tbsp. high quality balsamic vinegar
1/2 tsp. ground mustard
1/2 tsp. sea salt
1/2 tsp. freshly ground pepper
1 tsp. honey
1 clove garlic, minced

*no need to use a knife. Just snap them. If they don’t snap, they’re not very fresh.

Directions

  1. In a large saucepan, cover beans with water and boil for about 3 minutes. Have ready a large bowl full of ice water. Drain the beans and immediately put them in the ice bath. Cool completely, then drain and pat dry.
  2. In a large salad bowl, combine the beans, zucchini, tomatoes, onions, dill and feta.
  3. Prepare the dressing by whisking the next 7 ingredients together. Drizzle over the salad just before serving and toss.


Posted in salad dressing, salads, vegetables, vegetarian meals | Tagged , , , , , , , , , | Comments Off on Fresh Green Bean and Zucchini Salad with Balsamic Dressing

Fig and Goat Cheese Crostini

Fig and Goat Cheese Crostini
Sweet figs with a hint of orange are thinly spread over a toasted baguette and topped with fresh goat cheese and a sprinkle of chives or green onions in this, my newest “go-to” appy. I’ve made this one several times this summer, but it would be equally good at any time of the year. It’s uncomplicated goodness on a tiny piece of toast. The fig paste can be made well in advance and stored in the frig where it will keep for a week or two.
Earlier this week, I made this recipe to take on our “glamping” getaway to our friends’ beautiful West Coast cabin. We’re also heading out on our boat soon, so I’ve packed some to take with us. (If glam camping is known as glamping, would boat camping then be called bamping?)
BeachCollage
Sweet and salty. I never tire of that contrast in a dish. Use a gluten-free cracker or bread if you like. The photo shows it on small squares of gluten-free apricot and raisin bread.

Fig and Goat Cheese Crostini1

Fig and Goat Cheese Crostini

Yield: 1 baguette, about 24-30 slices (or substitute gluten-free bread or crackers)

Ingredients

  • 1 cup dried figs, (about 12) stems removed and quartered
  • ¾ cup orange juice
  • ½ cup water
  • 2 teaspoons grated orange zest
  • Pinch salt
  • 5 ounces fresh goat cheese at room temperature
  • 18 baguette slices, sliced on a sharp diagonal
  • 1 green onion, (scallion) or chives, thinly sliced
  • extra virgin olive oil for brushing on the crostiniDried figs

Directions

  1. Place the chopped dried figs, orange juice, water, orange zest and salt in a saucepan. Simmer over low heat until the figs are soft and only about 2 tablespoons of the liquid remains, 20 to 30 minutes. If the mixture gets dry, add water to keep it moist. Cool the mixture and puree in a blender or food processor to make a paste. Set aside.
  2. Preheat oven to 350F. Brush the baguette slices with a little olive oil. Toast the baguette slices for a few minutes until they are beginning to crisp. Spread the fig paste on each of the crostini, then top with about 1/2 Tbsp. goat cheese. Sprinkle with freshly chopped green onions or chives and serve.
Fig and Goat Cheese Crostini2
Posted in appetizers, boating or camping food, breads, Christmas, finger foods, gluten-free | Tagged , , , , , | Comments Off on Fig and Goat Cheese Crostini

Asparagus-Avocado Salad with Peas and Radishes

AsparagusAvocado Salad with Peas and Radishes.jpg

Even though I’ve lived in this valley all my life, I never tire of its beauty. Neither, apparently, does my daughter who is on a work-away on an olive farm in Tuscany right now. The closing line of her last email read, “I really miss the valley especially in all its spring glory! But I think a farm in Tuscany is the next best thing.”

Next best? Cowichan is more beautiful than the famous hill towns of Tuscany? Tuscany–the setting for countless romantic novels, famed for its olive groves and rolling hills and cypress-lined roads is, without a doubt, one of the most spectacular areas of the world. But one could certainly argue that our little valley can now rival it, both in beauty and in the wide variety of produce that the land supports.

Chive Blossom

That’s a really roundabout way of saying I’m grateful that I have so many local farms producing organic vegetables and fruit close by and at this time of year, I’m thankful to have an asparagus farm just down the road from my home. The asparagus shoots in this salad were picked only a few hours before they graced our lunch table. They’re oh so sweet and nothing like the ones imported from Mexico that lie wilting in the produce sections of our supermarkets.

Asparagus, radishes, avocados, peas and chives–does that spell springtime to you? This salad has a perfect balance of textures and flavours and they are all mingled together with a light sesame rice wine vinaigrette. What could be better on a sunny spring day?

asparagus salad with avocado, peas and radishes.jpg

I’ve adapted this recipe from a few I found circulating around Pinterest. Be sure to steam the asparagus lightly, just until crisp tender and bright green, then plunge it into an ice bath to stop further cooking.


Avocado-Aspargus Salad with Peas and Radishes
Serves 4
Ingredients

  • about 16 fresh asparagus spears
  • 1 ½ cups green peas, hulled
  • 1 firm avocado, peeled and thinly sliced
  • 10-12 radishes
  • 1 shallot, minced finely
  • 1/4 cup rice wine vinegar
  • 2 teaspoons honey
  • 3 Tbsp sesame oil (toasted sesame oil, if you have it)
  • sea salt to taste
  • 2 Tbsp toasted sesame seeds
  • snipped fresh chives and chive flowers for garnish

Directions

  1. Hold each asparagus spear, bend slightly and snap off the tougher end piece (usually an inch or two in length) Save for making soup.
  2. Steam the spears over boiling water in a steamer basket just until crisp tender and bright green. Immediately transfer to a bowl filled with ice water. Let cool and drain. Slice each asparagus spear into 2 inch lengths.
  3. Boil the peas for 1 minute, rinse in very cold water and then drain.
  4. Thinly slice the radishes.
  5. In a medium bowl, whisk together the shallots, rice wine vinegar, honey and sesame oil. Season to taste with sea salt. Add the asparagus, peas and radishes and toss together. Check the seasoning and sprinkle with sesame seeds.
  6. Peel and thinly slice the avocado just before serving to prevent it browning. Arrange the avocado slices around the edge of the serving platter. Drizzle with a little lemon juice if not serving immediately.
  7. Gently spoon the salad into the middle of the platter and garnish with fresh chives and chive blossoms. Chill and serve.
Bees love chive blossoms

I had to wait until this little guy was finished before picking my chive blossoms!

Posted in gluten-free, lunch, salad dressing, salads, vegetables, vegetarian meals | Tagged , , , , , , , , | Comments Off on Asparagus-Avocado Salad with Peas and Radishes

Rhubarb Crumble with Grand Fir Whipped Cream #gluten-free


Rhubarb Crumble with Grand Fir Whipped Cream.jpg

My back yard forest has exploded with green and filled in all of the barren gaps left by the winter. I have a host of plants to forage here, most of which I’m just learning about. A few years ago, one of our local chefs prepared a rhubarb compote and topped it with whipping cream flavored with Grand Fir shoots but he didn’t provide instructions!

This week I decided to tackle it. I snipped some of the most tender shoots from one of my Grand Fir trees and tried making a tea by pouring boiling water over it. I let it sit on the counter overnight, but it just didn’t seem to have enough flavour. Dumped it.

Next I did the same, but I reduced the amount of water to about 3 tablespoons and squeezed the shoots as I drained them a few hours later. Good, but then I realized it was going to make the whipping cream much too runny. Dumped it.

Finally, I put some fresh shoots in my Vitamix, poured in some heavy cream and a little sugar and just blended the hell out of it.

I think I like it. I’ll let the ones who will eat it for dessert decide for themselves.

Rhubarb Crumble with Grand Fir Whipping Cream
Serves 6 – 8

Ingredients
for the topping

  • 1 1/3 cups gluten-free flour (or all-purpose flour)
  • 1 tsp. baking powder
  • 6 Tbsp. coconut palm sugar
  • zest of one organic lemon
  • 1/2 cup melted butter

Combine all ingredients. Mix until clumpy, then refrigerate while preparing the filling.
Preheat oven to 375 degrees F.

 Fruit Filling

  • 1 1/2 cups rhubarb, chopped in 3/4 inch pieces
  • 4 cups strawberries, hulled and quartered
  • juice of one organic lemon
  • 1/2 cup sugar (type of your choice)
  • 1/4 cup cornstarch
  • 1/4 tsp. salt
  1. Combine all filling ingredients in a deep baking dish.
  2. Cover thickly with the topping.
  3. Since it will likely boil over, protect your oven by placing the dish on a foil-lined baking sheet. Bake till top is golden brown and fruit bubbles up, about 45 minutes. Best served warm. Top with Grand Fir Whipped Cream.Grand Fir Whipped Cream.jpgGrand Fir Infused Whipping Cream
  • 500 ml. (2 cups) heavy cream
  • 1 Tbsp. sugar (or to taste)
  • about 1/2 – 3/4 cup freshly picked Grand Fir shoots

Don't confuse with Douglas Fir.

Don’t confuse with Douglas Fir.

The needles on Grand Fir lie flat, not whorled as on Douglas Fir

The needles on Grand Fir are flat, not whorled as on Douglas Fir

Toss all in a high-speed blender. Select Variable speed, quickly turn to 10, then to High Speed. Watch carefully as it will only take about 10 -20 seconds to whip. Refrigerate until ready to serve.

Grand Fir Whipped Cream.jpg


Posted in desserts, gluten-free, wild foods | Tagged , , , , , , , , | 2 Comments

Mohitos for Mother’s Day

Let’s give Mom what she really wants.. Skinny muffins and low-cal brunch ideas and banana pancake breakfasts in bed are all lovely ideas for mom, but let’s take this route instead . . .

Here’s a roundup of Mohito recipes to celebrate your mother!

Rhubarb Mint Mohito
Rhubarb Mohito

Mohito Slushy
Mmmm . . . Mohito Slushy

Mohito: Cowichan Style
cowichan mohito.jpg


Like what you see here? Subscribe to my new blog, Flavour and Savour and never miss a recipe. “Like” my Facebook page here. Thanks!

Posted in beverages | Tagged , , , , | 2 Comments

Rhubarb Quinoa Salad

Rhubarb Quinoa Salad

Rhubarb with quinoa? These sound like odd companions, but the combination of flavours and textures in this salad seems to work. The tiny bit of honey is just enough to temper the tartness of the rhubarb and contrasts with the shallots. Be sure to use a salty cheese like Parmesan or even feta. The cucumbers and nuts contribute the necessary crunch factor and the mint makes it fresh and reminds your mouth that this is Spring! I used miner’s lettuce because it is abundant taking over my garden, but any greens will work. Arugula would add some spiciness. Create away!

Rhubarb Quinoa Salad

Serves 4
Ingredients

  • 1/2 cup quinoa, rinsed
  • 1 cup water
  • 2 tablespoons olive oil
  • 1 tablespoon honey
  • 1 shallot, or white part of 3 green onions (scallions) thinly sliced
  • 2 stalks rhubarb, washed and sliced into 1/4-inch pieces
  • 1 cup chopped cucumber
  • 2 to 3 cups washed greens of your choice
  • 1 cup shaved Parmesan Reggiano (just use a vegetable peeler)
  • 1/4 cup chopped fresh mint
  • 1/4 cup chopped hazelnuts, walnuts, or almonds, toasted
  • garnish with  green portion of green onions, or chopped chives and chive blossoms or other edible flowers

Dressing

  • 3 Tbsp.  olive oil
  • 2 Tbsp. apple cider vinegar
  • Salt and pepper

 Directions

1. Rinse the quinoa in cold water to remove any bitterness. Put the water in a small pot, and bring to a boil. Add the quinoa and cook until the water has all been absorbed. Fluff with a fork, let cool, then refrigerate.

2. In a frying pan, heat the olive oil over medium heat. Add the honey and stir to combine. Add the shallots and rhubarb and saute for 5 to 7 minutes, until rhubarb is tender but not mushy. Remove from heat and let cool to room temperature.

3. In a large bowl, whisk together the olive oil, vinegar,  and salt and pepper to taste. Add the cooled quinoa, the shallots and rhubarb, and the rest of the ingredients; toss and stir gently with just enough of the dressing to coat. Serve on a bed of fresh greens.

Rhubarb-Quinoa Salad<

Posted in gluten-free, quinoa, salad dressing, salads, vegetarian meals | Tagged , , , , | 2 Comments